Saturday, June 29, 2013

Candy Bouquets

Are you in need of a cute gift for someone?  This is great for any age and any occasion.  I made these for Father's Day but you could easily change it up for a different holiday.


What you will need:
 
Candy of your choice
Tissue Paper
Small Wooden Dowels
Scrapbook Paper
Printer (optional)
Container of some sort
Floral Foam
Hot Glue Gun


I bought enough supplies to make 2 bouquets.
First you are going to want to unpack all of your candies and get your hot glue gun plugged in.
The containers I used for this I found at Walmart and they are actually pencil holders.  You could use any container, bucket or pot you want for this project.


Place a line of hot glue on the top of one of the dowel rods.  Line up a candy bar and hold for a few seconds to make sure it sticks.  I used the fun sized bars but you could used regular sized ones if you want to.
 
 
Keep going until you have used up all of the candy bars.
 
 
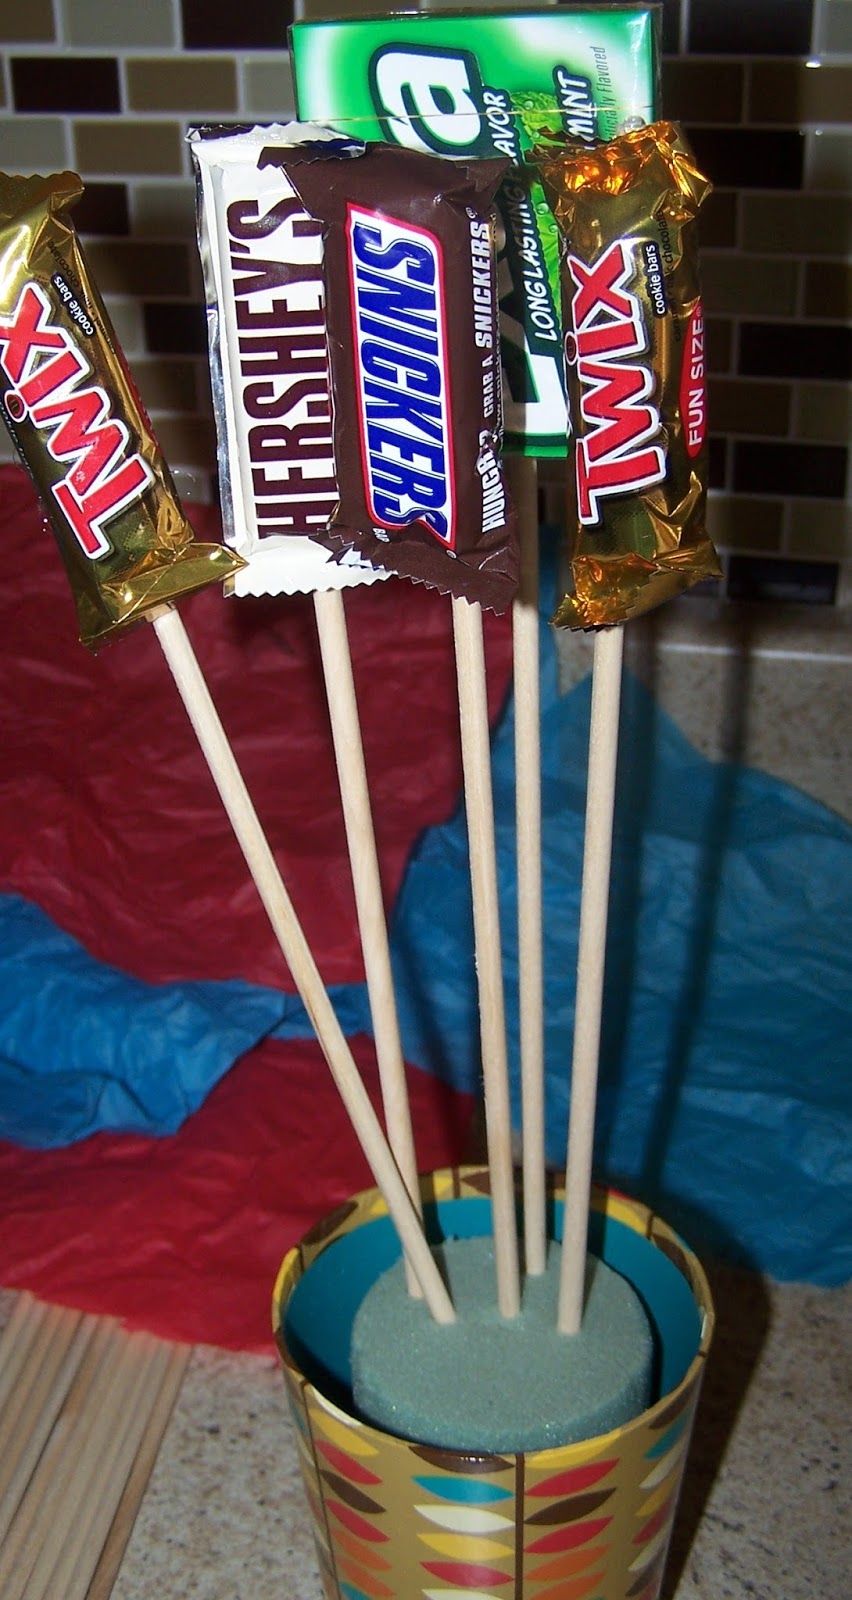
Now that you have finished with all of that, place your floral foam into your container.  Start putting in the dowel rods into the foam to make your bouquet.  I put some of mine in at angles so the bouquet would look fuller.
 
 
Once I had that done, I stuffed some tissue paper down in the container so that you didn't see a bunch of dowel rods.
 
 
Dress it up with a little sign to finish it off.
 
 
These were a HUGE hit with my Hubby and Dad.  They were really easy to do and my daughter had a lot of fun helping me make them.
 
All supplies came from Walmart except for what I had on hand.
 
Total cost for this project which will make 2 bouquets:
 
$8 for the Candy (fun sized bars)
$1 for the Containers ($0.50 each on clearance)
$1.94 for the Dowel Rods ($0.97 each)
$1.97 for Floral Foam
 
Tissue paper, hot glue, and scrapbook paper I already had on hand.
 
 
Did you make this project?  Link me!  I would love to see it!


Wednesday, February 20, 2013

DIY Bath Bombs


This was a fun project to do.  My daughter loves bath bombs and asks me to buy them for her all the time.
So off to the web I went to find a recipe.  Most of the recipes are the same but you will find the occassional variation.


Here is what you need to create the ones I made:
2 Cups Baking Soda
1 Cup Citric Acid (found a Walmart in the canning section)
Spray Bottle with Water
Fragrace (either essential oils or soap fragrance)
Food Coloring (optional)
Bowl
Whisk
Mold or Silicone Cupcake Molds
 

First you will want to mix up your baking soda and citric acid in a large bowl.  Make sure that you mix it really good.  I used a whisk for this.
Add in your fragrance oil.  Now for this part I used my soap oils that I buy to make my soaps but you can use essential oils if you don't have any of the soap fragrance.  I used about a teaspoon of my oil but it is very strong so you may want to use less.  It's all a personal preference.
 
I didn't get a picture of this next step but you are going to want to slowly mist your mixture with the water bottle and stir well.  I added food coloring to my bottle but it wasn't enough so my mixture turned out a very pale blue.
 
Keep doing this until you end up with what looks like the picture below.  You want this to pack nicely in your hand.  I used probably about 10 sprays of water for my mixture.  Yours may take more or less depending.
 
 
Once it starts to pack like that, pack it tightly into your molds. 


I let mine dry overnight.  I haven't gotten any pictures of the finished product unmolded but I will update with those later.
This recipe made 7 cupcake sized bath bombs.
 
Cost of this project:
$2.88 for the citric acid at Walmart
$0.50 for the Baking Soda
$1.97 for the silicone cupcake molds at Walmart
 
Food coloring, bowl, water, spray bottle, fragrance and whisk I had on hand.
 
 
Did you make this project?  Link me to it!  I would love to see it!


Wednesday, February 6, 2013

DIY Cupcake Tower


My daughters birthday is coming up and she is wanting to do a Monster High theme.  So in my quest to make it her best birthday ever,  I am doing quite a bit of crafting.  This project is fun because it can be adapted to any theme or occassion.
 
 
What you will need:
 
2 pieces of 12x12 scrapbook paper
2 stove burner covers
1 or 2 candlesticks
paint brush or paint sponge
scissors
glue gun
Modge Podge
acrylic paint (optional)


So here we go.  First I placed the cover face down on my scrapbook paper.  I traced lightly around it with a pencil.  Do this for each cover.
 
 
Cut them out and place them to the side for later.
 
 
Next I painted the edges of my covers black.  You can use any color you would like or leave them white.  I went with black since it matches our theme.
Let that dry.
 
 
Put a thin layer of Modge Podge over your burner cover.  Try to make sure it's evened out.  Place your paper on top of it and push out any bubbles.
Let that dry.
 
 
Once that is dry, add a thin layer of Modge Podge on the top of the paper to seal it in.  I did 2 coats of this.  Let those dry.
 
 
Time to assemble it.  Hot glue your candlestick down to the bottom tier of your cupcake stand.  I glued my stick upside down because the bottom of it was bigger and I wanted more room for the cupcakes.  Glue your top cover to the top of the candlestick.
Now if you purchased 2 candlesticks, you can glue one to the bottom tier so that it sits up off of the table or you can just leave it like it is.  I plan on getting another (probably shorter) candlestick for this.
 
 
Could that be any cuter?!  It is going to be the perfect addition to our Monster High table.
 
Cost of this project:
2 Scrapbook Paper $0.59 (Hobby Lobby 50% off)
2 Burner Covers $1 (Dollar Tree)
1 Candlestick $1 (Dollar Tree)
Total: $2.59!
 
Modge Podge, paint, hot glue, scissors, paint brush I already had on hand.
 
UPDATE:
Here is what our cute little cupcake stand looked like on our party table.  It matched perfectly!


Did you make this project?  Link me to it!  I would love to see it!


Thursday, January 31, 2013

Valentines Mason Jar Candle Holder


Do you have mason jars hanging around?  I do.  I have a ton of them that I used for canning.  I don't can as much as I use to so I always have extra jars that I can spare for crafting.
 
Valentines is one of those holidays that I feels always gets overlooked as far as decor goes.  This is a simple project that doesn't cost much.  In fact you probably have most of it on hand already.
 
What you will need:
Mason jar
Scraps of tissue paper (various colors)
Scissors
Modge Podge
Paint brush
 

Start by cutting out some hearts.  Make them all different sizes and colors.
 
 
Next you will want to start applying a thin layer of Modge Podge on your jar.  Do this sections at a time to make it easier. 
 
 
Place your tissue paper on the glue and smooth out.  Keep doing this a little at time until you reach the end.
 
 
Fold the edges in the jar and on the bottom.  Glue those down also.  Now just let it dry.
 

Now you can start adding on your hearts.  Put some glue down on the jar and place your heart on top.


Smooth that out.
Keep doing that until you have your jar looking the way you want it to.  We did a little layering on top of other hearts too.
 
 
Let it all dry.  Once that happens, you can add a thin layer of Modge Podge over the whole jar to seal it all in.
 
And there it is, an easy Valentines project for anyone.  As you can see my daughter did most of this by herself. 
 
Cost of this project:
Practically nothing.
I had the tissue paper, jar, Modge Podge, paint brush and scissors on hand.
 
Did you make this project?  Link me to it!  I would love to see it!


Monday, January 14, 2013

Crockpot Pork Tacos

 
I love using my crockpot every chance I get.  It makes my life so much easier.  My husband is a HUGE taco fan.  He would eat them every night if I would let him.  It tends to get boring with the same old thing so when I came across this recipe over at Chef in Training, I knew I had to make them.  I changed it up a bit in order to fit my families needs and they turned out awesome!
 
What you will need:
3 lb. pork roast
2 4oz. cans of green chiles
1 package of taco seasoning
1 TBS cumin
Corn shells
Shredded lettuce
Mexican blend cheese
Sour cream
1 lime
Salsa
 
Place your pork roast in your crockpot along with 1 can of chiles, taco seasoning and the cumin.  Let that cook on low for about 6-8 hours.  Now my crockpot gets hotter than others so mine went a little faster.  Once that gets all yummy and tender, remove roast and shred with 2 forks.  Add back to the crockpot and add in your additional can of chiles.  You can use more cans of chiles if you would like but that would have been way to spicy for my kiddos so I stuck with 2.  Let that cook another 1/2 hour to hour on low.
Now you can build your tacos.  We used lettuce, cheese, sour cream and squeezed lime on ours.  They were so yummy that I will definately be making these again.  Plus this recipe makes alot so you can invite some friends over or just save it for leftovers!


Sunday, January 13, 2013

Mexican Lasagna


The Holidays are finally over and I am able to slow down a bit.  It's been a very busy last 2 months.  My crafting has pretty much come to a hault but I can't wait to start creating again.  In the meantime I have tried out a few new recipes and I thought I would at least share those with you all.
 
So here we go.  First up, Mexican Lasagna.
I found this recipe over at Sugar & Spice and added my own touches to it.
 
What you will need:
 
Sauce:
1 TBS. olive oil
1 onion; diced
1 red bell pepper chopped and diced
1 small can green chiles
3 TBS. fresh green cilantro chopped
2 can diced tomatoes
1 TBS ketchup
1 cup water
1 package taco seasoning
1 lb. ground turkey
salt & pepper to taste
 
Filling:
1 can black beans drained and rinsed
1 can pinto beans drained and rinsed
1 can of corn drained
2 cups Mexican blend cheese
 
Other things needed:
Flour tortilla shells
1 1/2 to 2 cups Mexican blend cheese
13x9 baking dish
Pam spray
 
 
Preheat your oven to 400 degrees.  Spray your cooking dish with Pam to prevent sticking.  Heat olive oil in pan.  Add in your ground turkey and cook through.  Add taco seasoning, bell pepper, onion, water and chiles to pan.  Let simmer for a few minutes.  Dump your tomatoes in and let simmer for about 10 minutes.  While that is cooking, get to work on your filling mix.  In a bowl, combine the black beans, pinto beans, corn and the cheese.  Mix them together well.
Head back over to the sauce.  Once you have let it simmer for awhile, remove from heat and mix in your cilantro.
Now lets start stacking your layers. 
Start with a ladle full of the sauce in the bottom of the pan.  Cover that with tortillas.  I ripped some up to cover the empty spots.  Do another layer of the sauce (about 1/3 of it).  On top of that, do half of the filling mix.  Add another layer of the tortillas.  Keep going until you reach the top.  Once you hit the top layer, put the last remaining 1/3 of the sauce on top.
Place lasagna in the oven and bake for about 30 minutes.  After 25 minutes, top the lasagna with cheese.  Place back in oven until the cheese melts then remove.
Let the lasagna sit in the pan for 10 minutes before cutting so that it doesn't fall apart on you.
This dish is even better the next day too!


Sunday, December 2, 2012

Ho Ho Ho Christmas Canvas


It's been awhile since I've posted a craft here.  I've been super busy over at The Ladybug Landing the last few weeks.  I was able to throw this together though.
 
What you need:
3 canvases
ribbon
acrylic paint (red, green and black)
staple gun
stencil (optional)
quarter (optional)
 
As I was making this craft, I forgot to take pictures of the process.  Hopefully it's easy enough that I can just walk you through it though.
 
First what you are going to want to do is layout your design that you are going to want to paint on your canvases.  I choose stripes and dots.  I used a ruler to make the stripes and a quarter to make the dots.  Just lightly make pencil marks so you can see your design.
Paint your designs on and let that dry.


Next you are going to want to make your letters.  If you don't have a stencil big enough, you can make one on the computer which is what I did.  I just printed it out on paper and then cut them out.  Again, trace around them lightly with pencil so you can see where you need to paint.
Paint and let dry.
 
Now you can add your ribbon.  Layout your canvases face down on a counter top or the floor.  Space them evenly apart.  Take your ribbon and run it across the back of the canvases.  Staple them down with your staple gun.
On your top canvas, you are going to want to staple a ribbon to each corner of it.  Make sure they are long enough to create a bow.
Tie your bow and hang up your new creation!
 
Simple as that.
I have gotten quite a few compliments on this project.  You could even do different variations of this and for different holidays.
 
Cost of this project:
Nothing.  I had everything on hand already.   I just used the canvases from this project that my sister had left here.
 
Did you make this project?  Link me to it!  I would love to see yours!