Showing posts with label Craft. Show all posts

Sunday, October 20, 2013

Jack-O-Lantern Hand Soap

DIY Jack-O-Lantern Hand Soap
 
 
Here is another easy craft to do.  This is good for the little to make on their own also.
 
What you will need:
Hand Soap
Vinyl Scraps
Ribbon
Scissors
Pencil
 
 
First you will want to pencil out the shapes you want onto the back of vinyl.
 
 
Next, cut them out and apply them to the bottle.
 
 
Add a ribbon around the pump if you want to add a little something extra.


Cost of this project:
$0.98 for the soap with a coupon
 
Ribbon, Vinyl, Scissors and a Pencil I already had on hand.
 
 
*You could also make a ghost soap using the same steps here if you have white soap on hand*


Tuesday, August 20, 2013

Glittered Picture Frame and Light Switch Cover


For the last week or so I have been busy re-doing my daughters bedroom.
She decided she no longer wanted pink, green and butterflies and instead wanted black and bright pink.
Pretty bold colors and she had some bold ideas to go along with it.
One of her ideas is GLITTER!
Lots and lots of glitter was requested.
So, I am on a quest to glitterize as much as I can without going over board. 
This is the first of my "glitter" projects.


What you will need:
 
Frame and/or Lightswitch cover
Modge Podge
Paint brush/sponge
Glitter
Newspaper

 
I am sure that there are many ways out there to add glitter to something but this worked out really well for what we were doing so here goes.
 
 
First I added a thick layer of Modge Podge to the frame and switch plate.  I did a small section at a time.


Sprinkle the glitter on generously.  Don't miss any spots.  Better to throw more on then have to go back and do it again.
Go around the whole thing and then let dry completely.
 
 
Once dry, lift up your frame or switch plate and tap off the excess glitter onto the newspaper. 
Make sure you get as much off as you can by doing this.


After I did this, I realized that some more glitter will probably come off and cause me more heartache so my solution was to put a thick layer of Modge Podge over the glitter.  This made the rest of the glitter stay in place.  Since it dried clear, you can't even tell and it made it a little smoother.


Here is the finished product.
I am very pleased with how it turned out.
  I still haven't hung up the frame but I will update with photos as soon as I do.
 
 
Cost of this project:
 
$1.38 for the frame from Goodwill
 
Glitter, Modge Podge, Brush and Switch Cover I already had on hand.


Did you make this project?  Link me to it!  I would love to see it!


Sunday, August 4, 2013

Initial Decoration


This craft is very simple and shouldn't take you much time to do at all.
You can make this craft for any season or Holiday!
 
 
What you will need:
 
A wooden letter
Scrapbook paper
Modge Podge
Foam Brush
Acrylic paint (optional)
Paint brush (optional)


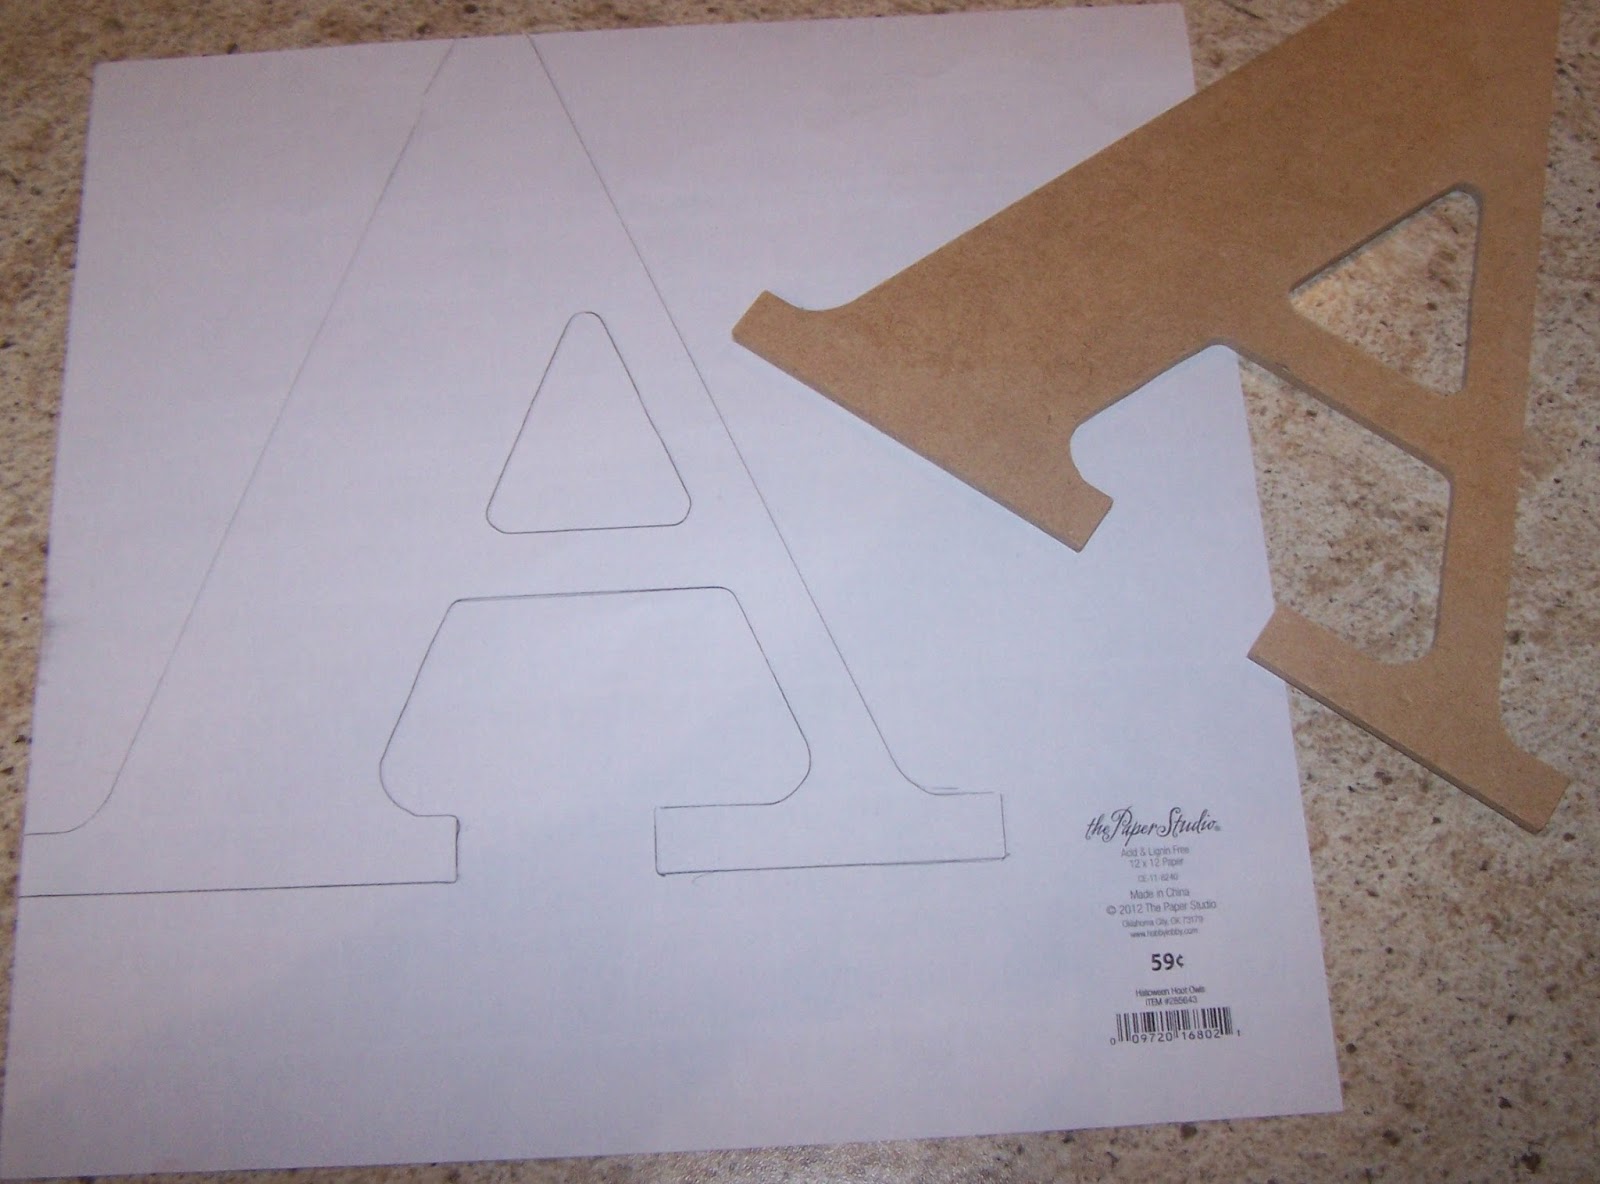
First lay out your letter backwards on the scrapbook paper.  I tried to line it up with the edges of the paper as you can see from above.
Trace around your letter.

 
Once your letter is traced, cut it out very carefully.
I cut on the inside of the line of the letter.
 
 
Once you have it cut out, make sure that it the paper lines up correctly with the wooden letter.  Trim things if you need to.
 
 
Next what I did was paint the edges of my letter.  You don't have to do this if you don't want to but I'm going to be displaying mine on a shelf so I wanted it to have a finished look since you can see the sides.
Let that dry.
 
 
Put a nice thin coat of Modge Podge on the wooden letter.


Lay your scrapbook paper down on top and smooth it out.
Let that dry.
 
 
Once that is all dry, put a thin layer of Modge Podge over the top.
Let dry.
Repeat this step so you have 2 layers of Modge Podge on it.
 
 
All that is left to do now is enjoy your finished product!
 
 
Cost of this project:
 
$1.49 for the wooden A at Hobby Lobby (I used a 40% off coupon)
$0.59 for the scrapbook paper at Hobby Lobby.
 
Modge Podge, Brushes and Paint I already had on hand.
 
 
Did you make this craft?  Link me to it!  I would love to see it!


Friday, July 26, 2013

Fingerprint Fall Tree Canvas


The weather was cooler outside today and I got in the mood to do a Fall craft with my youngest.
This was really easy to do and my daughter had a blast making it with me.  Too bad my oldest refuses to do things like this with his Mom.  It's those darn teenage years I guess.
 
 
What you will need:
 
Acrylic Paint (brown, red, yellow, orange and green)
Paint Brush
Canvas


First I started out by creating the tree.  I just free-handed it.

 
Paint your little ones finger and have them start putting on the leaves.

 
There is no certain way to do this.  We just started putting them on and then we went back in and started filling in spots that were empty.  Keep going until you have your desired look.
Be sure to date the back and add your childs name!
 
 
Cost of this project:
 
Nothing. 
I already had the paint, paint brush, the canvas from here and of course the little fingers. 
 
 
Did you make this craft? Link me to it! I would love to see it!  


Sunday, June 30, 2013

Patriotic Handprint Shirt


With the 4th of July coming up, I thought it would be nice to make one of these t-shirts with my youngest.  I found it over here on CraftyErin
 
 
What you will need:
 
White T-shirt or tank top
Red and Blue Paint
Painters Tape (optional)
Paint Brush
Dish to hold paint
Cardboard
 
 
This is a pretty straightforward project and it was easy enough that my daughter was able to do this by herself (well mostly).
First you are going to want to lay out your shirt and place the cardboard on the inside of it so that the paint doesn't soak through.  I didn't have any fabric paint so I used acrylic paint.  I plan on only handwashing this shirt so it shouldn't be too much of a problem.
 
 
Paint your childs hand.  This of course is my daughters favorite part.
 
 
Firmly press their little hand down in the upper right part of the shirt.
Let this dry.
 
 
After that dried, I started making stripes out of painters tape.  I did this so that it would be easier for my daughter to paint straight lines by herself.
 
 
Paint between the tape with the red.
Let dry.
 
There you have it!  Easy and fun to do. 


Cost of this Project:
 
$3.47 for the shirt at Walmart
 
Paint, Brush, and painters tape I already had on hand.


Did you make this craft? Link me to it! I would love to see it!


Wednesday, February 20, 2013

DIY Bath Bombs


This was a fun project to do.  My daughter loves bath bombs and asks me to buy them for her all the time.
So off to the web I went to find a recipe.  Most of the recipes are the same but you will find the occassional variation.


Here is what you need to create the ones I made:
2 Cups Baking Soda
1 Cup Citric Acid (found a Walmart in the canning section)
Spray Bottle with Water
Fragrace (either essential oils or soap fragrance)
Food Coloring (optional)
Bowl
Whisk
Mold or Silicone Cupcake Molds
 

First you will want to mix up your baking soda and citric acid in a large bowl.  Make sure that you mix it really good.  I used a whisk for this.
Add in your fragrance oil.  Now for this part I used my soap oils that I buy to make my soaps but you can use essential oils if you don't have any of the soap fragrance.  I used about a teaspoon of my oil but it is very strong so you may want to use less.  It's all a personal preference.
 
I didn't get a picture of this next step but you are going to want to slowly mist your mixture with the water bottle and stir well.  I added food coloring to my bottle but it wasn't enough so my mixture turned out a very pale blue.
 
Keep doing this until you end up with what looks like the picture below.  You want this to pack nicely in your hand.  I used probably about 10 sprays of water for my mixture.  Yours may take more or less depending.
 
 
Once it starts to pack like that, pack it tightly into your molds. 


I let mine dry overnight.  I haven't gotten any pictures of the finished product unmolded but I will update with those later.
This recipe made 7 cupcake sized bath bombs.
 
Cost of this project:
$2.88 for the citric acid at Walmart
$0.50 for the Baking Soda
$1.97 for the silicone cupcake molds at Walmart
 
Food coloring, bowl, water, spray bottle, fragrance and whisk I had on hand.
 
 
Did you make this project?  Link me to it!  I would love to see it!


Wednesday, February 6, 2013

DIY Cupcake Tower


My daughters birthday is coming up and she is wanting to do a Monster High theme.  So in my quest to make it her best birthday ever,  I am doing quite a bit of crafting.  This project is fun because it can be adapted to any theme or occassion.
 
 
What you will need:
 
2 pieces of 12x12 scrapbook paper
2 stove burner covers
1 or 2 candlesticks
paint brush or paint sponge
scissors
glue gun
Modge Podge
acrylic paint (optional)


So here we go.  First I placed the cover face down on my scrapbook paper.  I traced lightly around it with a pencil.  Do this for each cover.
 
 
Cut them out and place them to the side for later.
 
 
Next I painted the edges of my covers black.  You can use any color you would like or leave them white.  I went with black since it matches our theme.
Let that dry.
 
 
Put a thin layer of Modge Podge over your burner cover.  Try to make sure it's evened out.  Place your paper on top of it and push out any bubbles.
Let that dry.
 
 
Once that is dry, add a thin layer of Modge Podge on the top of the paper to seal it in.  I did 2 coats of this.  Let those dry.
 
 
Time to assemble it.  Hot glue your candlestick down to the bottom tier of your cupcake stand.  I glued my stick upside down because the bottom of it was bigger and I wanted more room for the cupcakes.  Glue your top cover to the top of the candlestick.
Now if you purchased 2 candlesticks, you can glue one to the bottom tier so that it sits up off of the table or you can just leave it like it is.  I plan on getting another (probably shorter) candlestick for this.
 
 
Could that be any cuter?!  It is going to be the perfect addition to our Monster High table.
 
Cost of this project:
2 Scrapbook Paper $0.59 (Hobby Lobby 50% off)
2 Burner Covers $1 (Dollar Tree)
1 Candlestick $1 (Dollar Tree)
Total: $2.59!
 
Modge Podge, paint, hot glue, scissors, paint brush I already had on hand.
 
UPDATE:
Here is what our cute little cupcake stand looked like on our party table.  It matched perfectly!


Did you make this project?  Link me to it!  I would love to see it!